Looker Studio is a free reporting tool provided by Google that connects to various data sources, enabling the creation of easy-to-understand, fully automated reports. This article explains the different methods available for sharing reports in Looker Studio.
What is Looker Studio?
Looker Studio is a free reporting tool provided by Google that connects with various data sources to create easy-to-understand, fully automated reports.
Benefits of the Report Sharing Feature in Looker Studio
Looker Studio's sharing feature offers numerous benefits, as outlined below.
Reduction of Workload
By automating the creation and sharing of reports, you can significantly reduce the time and effort previously spent on manual tasks. This is especially useful when regular report distribution is required.
Faster Decision-Making
Using Looker Studio allows you to easily share reports among team members, enabling quicker decision-making.
Real-Time Data Sharing
By sharing reports, team members can view the latest data in real time, allowing for prompt actions based on the most up-to-date information.
Enhanced Security
Looker Studio offers strict control over who can share reports and what permissions are granted. This ensures data security while allowing access only to those who need it.
Flexible Sharing Options
Reports can be downloaded in PDF format, sent directly via email, or embedded into websites, providing various sharing methods to meet diverse needs.
These advantages make Looker Studio's sharing features an essential tool for enhancing business productivity. In the next section, we will detail the specific sharing features.
Invite other users individually
You can invite individual users or groups separately.
To use this feature, click on "Share" at the top right, enter the target email address (associated with a Google account), select either Viewer or Editor, and click "Send."
For a clear explanation of the differences in permissions between Viewer and Editor, please refer to "[Looker Studio] Access Permissions | Differences between Viewer, Editor, and Owner."

(Quote:Looker Studio)
Inviting Multiple Users at Once
This method allows you to grant viewing access to Looker Studio reports, regardless of whether users have a Google account.
To use this feature, click “Share” in the top right corner, then select “Unlisted” under “Link settings,” and choose either “Viewer” or “Editor.” You can share the report URL via email or other means. You can also set the report to “Public” for searchable access or restrict access to users within your company domain.

(Quote:Looker Studio)
Setting Up a Delivery Schedule
You can regularly send PDF versions of Looker Studio reports via email.
To use this feature, select "Share" in the top right corner, then choose "Schedule Email Delivery." Set the recipient, the pages to be sent, the delivery frequency (repeat), and click "Save."

(Quote:Looker Studio)
Download in PDF Format
You can download the report in PDF format.
To use this feature, select "Share" at the top right, then choose "Download report," select the pages you want to download, and click "Download."
For detailed instructions and important notes on using the PDF download feature, please refer to "[Looker Studio] How to Download Reports in PDF Format."

(Quote:Looker Studio)
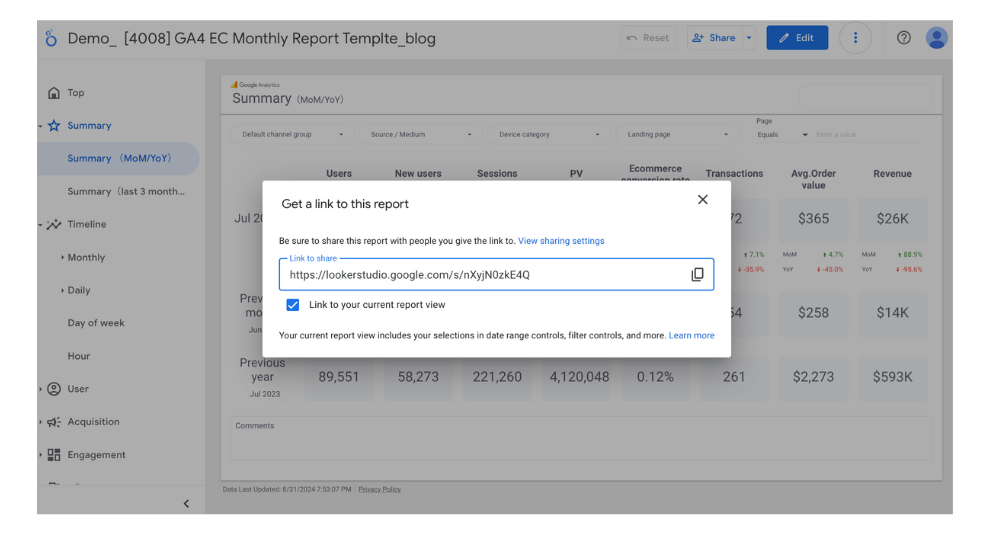
Get a Link to this Report
You can generate a Looker Studio report and share it for various purposes. By checking the "Link to the current view of the report" option, you can include the current settings of the report, such as filters and time periods.

(Quote:Looker Studio)
Embedding Reports on Other Sites
You can embed reports on Google Sites or any website that supports iframes.
To use this feature, go to "File" and select "Embed Report." Then, check "Enable Embedding," click "Copy to Clipboard," and paste the code into the target site.

(Quote:Looker Studio)
Related Looker Studio Official Documentation
Looker Studio Official Help: Ways to share your reports
We also recommend this article
GA4 sampling occurs when a large amount of data is used in an exploratory report and the number of events required to aggregate the report exceeds a certain upper limit. When this limit is exceeded, a representative sample is taken and a report is generated based on that sample data.
[GA4] How to create monthly and daily reports for E-commerce | Explore
This article will show you how to create monthly and daily reports using GA4's exploratory reports for e-commerce sites in an easy-to-understand manner. In this article, you will learn in detail how to create monthly and daily reports for e-commerce sites, as well as the key points to keep in mind when creating reports.
[GA4] How to Create Monthly/Daily Reports | Explore
This article will show you how to create monthly and daily reports using GA4's exploratory reports in an easy-to-understand manner. Read this article to learn more about how to set up monthly and daily reports and what to look out for.
This article provides a clear explanation of the data retention period for GA4. After reading this article, you will know how to change the data retention period for "exploratory reports" from the default of 2 months to 14 months, and that, in fact, data longer than 14 months is available without problems for most GA4 reports except for "exploratory reports".
[GA4]How to use Explore | with Recommended Template
GA4's "Exploratory Report" allows for easy customization of items and advanced analysis using segments. Use them when you want to analyze your data in more detail. This article explains the types of GA4's "exploratory reports" and how to use them in an easy-to-understand manner. Examples of recommended report settings will also be introduced for your reference.

![[Looker Studio]Summary of Report Sharing Methods | User Invitations, Email Delivery, PDF Downloads, etc.](http://88studio.io/cdn/shop/articles/1280_x_450_px_65517d64-df17-4cc1-82e2-58619b306311.png?v=1725102714&width=1100)
![GA4 Summary Report Template[4013]](http://88studio.io/cdn/shop/files/4013thumbnail.png?v=1733209235&width=533)
![GA4 Monthly Report Template[4007]](http://88studio.io/cdn/shop/files/4007_GA4-monthly-report-firstview_80551e9b-22ec-47d9-a375-29691372a34f.jpg?v=1702969299&width=533)
![GA4 EC Monthly Report Template[4008]](http://88studio.io/cdn/shop/files/4008_75c0c108-4e41-4fee-87ec-e7c823b6939d.png?v=1743466274&width=533)
![GA4 Standard Report Template[4004]](http://88studio.io/cdn/shop/files/4004_f67fd549-68fe-46c3-b8bc-57b0cad056ee.png?v=1740969729&width=533)
![GA4 EC Standard Report Template[4012]](http://88studio.io/cdn/shop/files/4012v2.0.png?v=1745371761&width=533)
![Google Ads Report Template[4003]](http://88studio.io/cdn/shop/files/4003_v2_1.png?v=1737458695&width=533)
![SEO Standard Report Template [4002]](http://88studio.io/cdn/shop/files/4002v2.0.png?v=1747814286&width=533)
![GA4 EC Basic Dashboard Template[4010]](http://88studio.io/cdn/shop/files/4010v2.0.png?v=1745966967&width=533)
![SEO Monthly Report Template[4011]](http://88studio.io/cdn/shop/files/4011_v2.png?v=1737028939&width=533)
![GA4 Dashboard Template[4009]](http://88studio.io/cdn/shop/files/4009v2.0.png?v=1740388404&width=533)