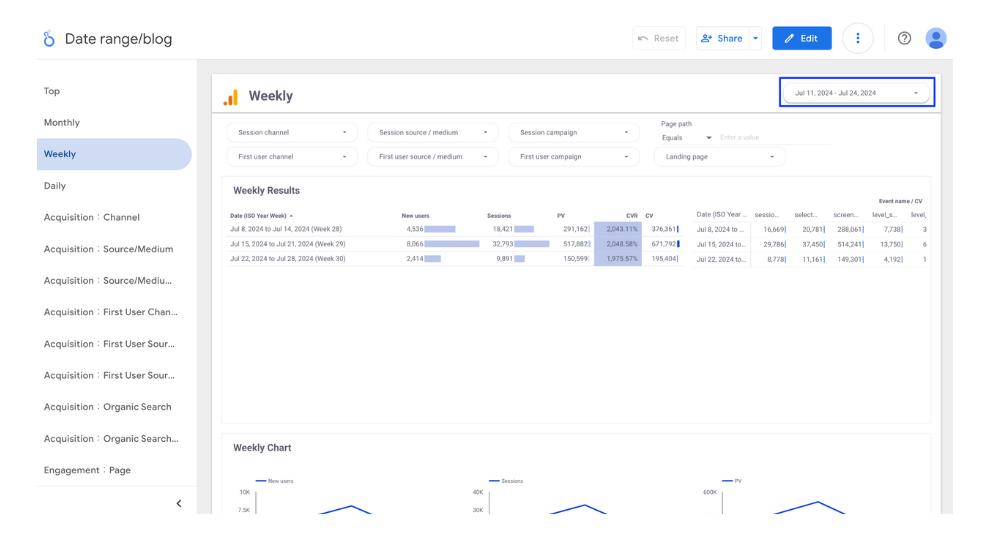
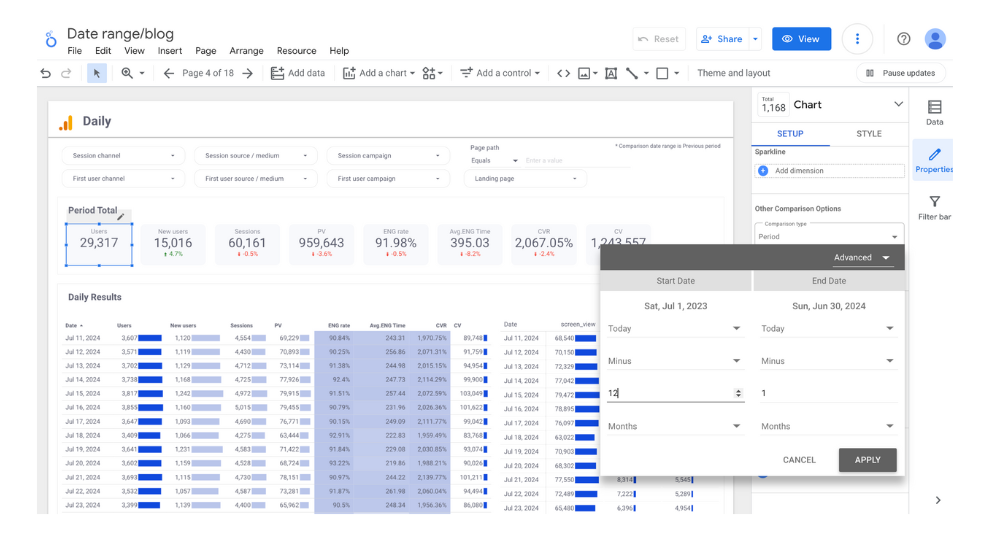
This article explains in detail how to set the period for the data displayed in Looker Studio reports using GA4 data. There are multiple methods for setting periods, such as on a report level or a page level, and some allow you to change the period when viewing the report. Additionally, comparison periods can be set for certain graphs. We will explain each of these methods in detail.
Date Range Settings in Looker Studio
When creating reports in Looker Studio with data that has a date range, such as GA4, you can set the period of data to be displayed in the report.
You can set the date range at the report level, page level, and component level (such as tables and charts). Additionally, you can determine the default date range to display, and also allow the report viewers to freely change the date range when viewing the report.
Furthermore, there is also a comparison period feature that displays how much the data has increased or decreased compared to a specific period.
□ Related Articles:Set report date ranges
How to set the date range that can be changed when viewing the report
First, we will explain how to change the date range displayed when viewing the report. This setting can be configured per report or per page, but it cannot be set per component.
Add Date range control
From the Add a control, select the Date range control.

(Quote:Looker Studio)
Select the location where you want to add the date range display and click.

(Quote:Looker Studio)
Set the default date range
The installed period display is set to show data for the past 28 days by default. You can change this to any desired date range. Select the installed period display, then choose the default date range from the settings menu on the right.

(Quote:Looker Studio)
Select the automatic date range option in the top right corner of the displayed calendar to see the available date range options. Choose the desired date range to display. You can also specify an absolute date range other than the available options. For this example, we will set it to the past 14 days. Once you have made your selection, click apply.

(Quote:Looker Stduio)
This allows you to set the default date range displayed on this page to the past 14 days. Additionally, you can change the date range by selecting the date range display when viewing the page.

(Quote:Looker Studio)
At this stage, the set date range is reflected across the entire page. Next, we will explain how to apply the set date range to the entire report, including other pages.
Expanding the scope to the entire report using report-level filters
After selecting the date range, right-click. From the displayed menu, choose "Change to Report Level.

(Quote:Looker Studio)
Then, the date range setting was displayed on another page, and this date range setting was applied to the entire report.

(Quote:Looker Studio)
The above instructions explain how to change the date range when viewing reports. When you need to adjust the date range to view or compare different data in your reports, please use this method to set the desired date range.
How to Set a Date Range That Cannot Be Changed When Viewing the Report
Next, I will explain how to set periods that cannot be freely changed when viewing the report. This method allows settings to be made on a report-by-report, page-by-page, or component-by-component basis.
Set the date range for the report
How to set the period for the entire report at once.First, select "Report Settings" from the file menu.

(Quote:Looker Studio)
The report settings menu will appear on the right side. Select the target data source and change the default date range from automatic to custom. Next, select the date range displayed below.

(Quote:Looker Studio)
From the settings screen for the displayed period, set and select the desired date range. This time, select "Last 7 days" from the options and click "Apply."

(Quote:Looker Studio)
This has changed the date range for the entire report to the past 7 days.

(Quote:Looker Studio)
Set the date range on the page
Next, here is how to set the date range for the page. From the page menu, select the settings for the current page.

(Quote:Looker Studio)
Following the previous report settings, select the target data source and change the default date range from automatic to custom. Next, select the date range displayed below. In this case, we chose the past 14 days.

(Quote:Looker Studio)
Now, you can display the data on this page for the past 14 days.
Set the date range for the component
Finally, we will explain how to set the date range for each component, such as graphs and tables. Select the component for which you want to set the date range, and then change the default date range from the settings displayed on the right, just as you would for the report or page date range.

(Quote:Looker Studio)
You can now set the date range for each component.
Priority of Applying the Set Date Range
The methods for setting the date range at the report level, page level, and component level have been explained so far. If different date ranges are set at the page level and the component level, which setting will take precedence? The priority for date range application is as follows:
- Component
- Page
- Report
This means that even if a date range is set at the report level, if a different date range is set at the page level, the date range for that page will be applied.
If a specific component does not reflect the date range set at the page level, check the date range settings for that component.
Options for selecting the date range and detailed settings method
Here, we will explain in detail how to set the date range. In addition to the predefined options, you can also set the range flexibly using absolute specifications.
Types of Options
The date range options are as follows:
- Last 7 days
- Last 14 days
- Last 28 days
- Last 30 days
- Today
- Yesterday
- This week (from Sunday)
- This week (from Monday)
- From this Monday to today
- Last week (from Monday)
- This month
- From the beginning of this month to today
- Last month
- This quarter
- From the beginning of this quarter to today
- Last quarter
- This year
- From the beginning of this year to today
- Last year
- Fixed
- Advanced
If the date range you want to display is within these options, please choose it. If it is not, you can select either the "Absolute range" or "Custom range" options to set a more detailed range.
Display data for a fixed period with an absolute specification.
When you select the absolute specification, you can set the range yourself from the calendar. With the absolute specification, data is always displayed for a fixed date range regardless of the date you view the report. The example below is set to always display data from April 1, 2024, to April 30, 2024.

(Quote:Looker Studio)
Display dynamic period data in Advanced
In the detailed settings, you can set dynamic period data based on today's date. For example, you can set periods like the past 3 months or the past 12 months, which were not included in the original options. Here are some specific examples of the settings.
How to Set the Date Range for the Past 3 Months
You can specify the past three months by setting it as follows.

(Quote:Looker Studio)
How to Set the Date Range for the Past 12 Months
You can specify the past 12 months by setting it as follows.

Method for specifying the period from April 1, 2023, to yesterday
By setting it as follows, you can specify the period from April 1, 2023, to yesterday. This combination with absolute specification is also possible.

(Quote:Looker Studio)
How to Set the Comparison Period
Finally, let's explain how to set the comparison period. By setting a comparison period, you can display how much the data shown has increased or decreased compared to a certain period on the component. The comparison period is set on a per-component basis. Therefore, it cannot be set in bulk for reports or pages. Additionally, some components may not allow setting a comparison period.
Setting location for the comparison period
When you select a component, you can configure it from the bottom of the settings menu displayed on the right side.

(Quote:Looker Studio)

![[Looker Studio] Guide to Setting Report Date Range | How to Set Date Range for the Entire Report and Use Compared Date Range](http://88studio.io/cdn/shop/articles/1280_x_450_px_0a0bdcca-beec-4036-aee4-c500bf5bb35c.png?v=1721868601&width=1100)
![GA4 Summary Report Template[4013]](http://88studio.io/cdn/shop/files/4013thumbnail.png?v=1733209235&width=533)
![GA4 Monthly Report Template[4007]](http://88studio.io/cdn/shop/files/4007_GA4-monthly-report-firstview_80551e9b-22ec-47d9-a375-29691372a34f.jpg?v=1702969299&width=533)
![GA4 EC Monthly Report Template[4008]](http://88studio.io/cdn/shop/files/4008_75c0c108-4e41-4fee-87ec-e7c823b6939d.png?v=1743466274&width=533)
![GA4 Standard Report Template[4004]](http://88studio.io/cdn/shop/files/4004_f67fd549-68fe-46c3-b8bc-57b0cad056ee.png?v=1740969729&width=533)
![GA4 EC Standard Report Template[4012]](http://88studio.io/cdn/shop/files/4012v2.0.png?v=1745371761&width=533)
![Google Ads Report Template[4003]](http://88studio.io/cdn/shop/files/4003_v2_1.png?v=1737458695&width=533)
![SEO Standard Report Template [4002]](http://88studio.io/cdn/shop/files/4002v2.0.png?v=1747814286&width=533)
![GA4 EC Basic Dashboard Template[4010]](http://88studio.io/cdn/shop/files/4010v2.0.png?v=1745966967&width=533)
![SEO Monthly Report Template[4011]](http://88studio.io/cdn/shop/files/4011_v2.png?v=1737028939&width=533)
![GA4 Dashboard Template[4009]](http://88studio.io/cdn/shop/files/4009v2.0.png?v=1740388404&width=533)